Dragspel
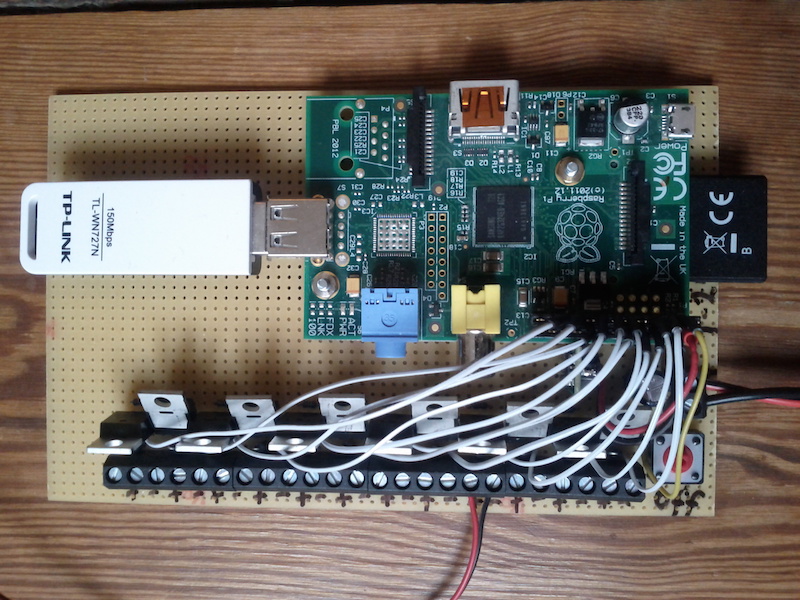
This board is using an old Raspberry Pi 1 to control the speed of computer fans. The electronics are pretty simple (see attached schematics below): it takes 7-36V input power, has twelve MOSFETs for PWM control and finally a DC-DC converter to power the RPi. It was built for controlling PC cooling fans but can also drive other types of DC motors, lightbulbs or solenoids. The off button is there to safely power down the Raspberry Pi.
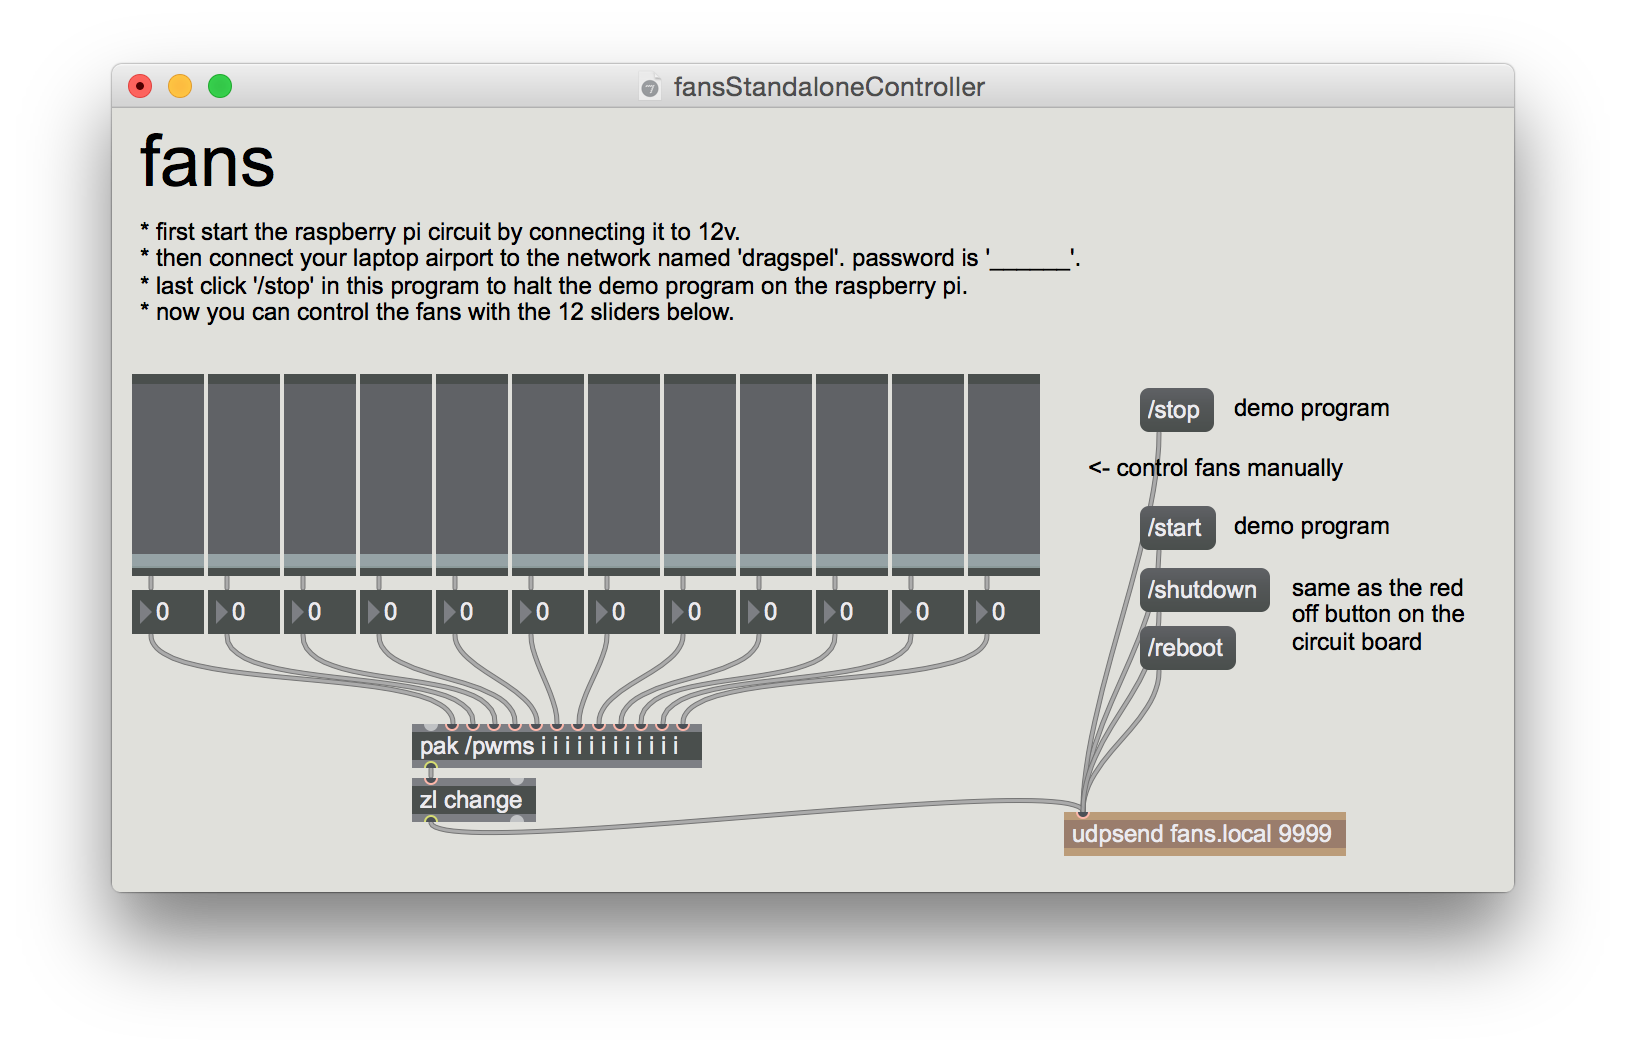
The trick with this though is that the system can be livecoded over WiFi using SuperCollider, MaxMSP or any other OSC capable program. So when you start the board the RPi sets up a wireless access point and starts a Python script that accepts incoming Open Sound Control messages. At startup, the RPi1 will also start SuperCollider and load a file (dragspelFans.scd) that is meant to contain whatever code you'd like to run as default. This file you later overwrite with your own SuperCollider code that you've developed/livecoded using your laptop.

Below are step-by-step instructions on how I set this up plus the relevant Python and SuperCollider code. It should work on all RPi models but here the RPi1 or RPi0 is assumed.
preparation
- download and install raspbian-stretch-lite onto a 2 GB SD card
- to enable SSH, create an empty file on the SD card. Call it ssh. (this terminal command
touch /Volumes/boot/sshwill do it on macOS or just create an empty text file and save it without any file extension) - connect your RPi to your home router via ethernet and type the following in terminal on your laptop:
ssh-keygen -R raspberrypi.localssh pi@raspberrypi.local#default password is raspberrysudo raspi-config#change password to _____, set memory split to 16 under advanced, change hostname to fans under network, update, finish and reboot (sudo reboot)ssh pi@fans.local#log in again from your laptopsudo apt-get updatesudo apt-get upgradesudo apt-get dist-upgrade
Python
This section will install OSC and GPIO libraries for Python and also set up the Python script to automatically start at system boot.
sudo apt-get install python-liblo pigpio python-pigpiosudo crontab -e#and add the following line at the end (use ctrl+o and ctrl+x to save and exit):
@reboot /usr/bin/pigpiod -s 5 && /usr/bin/python /home/pi/dragspelFans.py
nano ~/dragspelFans.py#and copy&paste in the following:
#f.olofsson2016-2018
#pwm control for 12 fans/motors/LEDs

#NOTE: make sure to run this in terminal first...
# sudo pigpiod -s 5

import sys
from os import system
from time import sleep
import pigpio
from liblo import *

inport= 9999  #for OSC commands to this Python script
pinoff= 2  #bcm numbering
pins= [3, 4, 14, 15, 17, 18, 27, 22, 23, 24, 10, 9]  #bcm numbering - more can be added here
target= ('127.0.0.1', 57120)  #for OSC to sclang
hz= 800  #pwm frequency in hz - note may need to adapt -s option in sudo pigpio -s 5 above
range= 100  #duty cycle range 0 to 100

pi= pigpio.pi()
pi.set_mode(pinoff, pigpio.INPUT)  #no internal pullup needed
for pin in pins:
  pi.set_mode(pin, pigpio.OUTPUT)
  pi.set_PWM_frequency(pin, hz)
  pi.set_PWM_range(pin, range)
  pi.set_PWM_dutycycle(pin, 0)

class MyServer(ServerThread):
  def __init__(self):
    ServerThread.__init__(self, inport)
  @make_method('/pwms', 'i'*len(pins))
  def pwms_callback(self, path, args):
    #print args  #debug
    i= 0
    for pin in pins:
      pi.set_PWM_dutycycle(pin, min(max(0, args[i]), range))
      i= i+1
  @make_method('/shutdown', '')
  def shutdown_callback(self, path, args):
    stop('sudo halt -p')  #turn off rpi
  @make_method('/reboot', '')
  def reboot_callback(self, path, args):
    stop('sudo reboot')  #reboot rpi
  @make_method('/start', '')
  def start_callback(self, path, args):
    send(target, '/start', 1)  #start default program in SuperCollider
  @make_method('/stop', '')
  def stop_callback(self, path, args):
    send(target, '/stop', 0)  #stop default program in SuperCollider
    for pin in pins:  #and also set all pwm to 0
      pi.set_PWM_dutycycle(pin, 0)
  @make_method(None, None)
  def fallback(self, path, args):
    print 'received unknown message "%s"' % path

def stop(cmd):
  pi.stop()
  server.stop()
  system('killall pigpiod sclang')
  system(cmd)
  sleep(1)
  sys.exit()

try:
  server= MyServer()
except ServerError, err:
  print str(err)
  sys.exit()
server.start()

def main():
  while True:
    if pi.read(pinoff)==0:
      print 'shutting down...'
      stop('sudo halt -p')
    sleep(0.5)

if __name__ == '__main__':
  try:
    main()
  except KeyboardInterrupt:
    pi.stop()
Again use ctrl+o and ctrl+x to save and exit. Now sudo reboot and then try to send OSC commands to the RPi. Here's how to send some test OSC messages from your laptop to the RPi using SuperCollider...
n= NetAddr("fans.local", 9999);
n.sendMsg(\pwms, *[50, 0, 0, 0, 0, 0, 0, 0, 0, 0, 0, 0]);  //the number of integers should match the number of pins and range in your Python code (here 12 pins, 0-100)
n.sendMsg(\pwms, *[25, 50, 75, 0, 0, 0, 0, 0, 0, 0, 0, 0]);  //first pin 25%, second %50 third 75%, rest 0
n.sendMsg(\pwms, *[0, 0, 0, 0, 0, 0, 0, 0, 0, 0, 0, 0]);  //all off
You can also try to connect pin bcm2 to ground. That should now act like an off button and turn off the RPi in a safe way.
SuperCollider
This section is optional. Only install SuperCollider if you want to run your RPi as a standalone installation or something similar. So if you plan to always remote control the system you can skip over this step.
Note: this is for RPi0&RPi1, for RPi2&RPi3 change all references to supercolliderStandaloneRPI1 below to supercolliderStandaloneRPI2
See github.com/redFrik/supercolliderStandaloneRPI1#lite for more details (this page also show how to install jackd if you need audio from your RPi).
sudo apt-get install libqt5webkit5 libqt5sensors5 libqt5positioning5 libfftw3-bin libcwiid1 git libasound2-dev libsamplerate0-dev libsndfile1-dev libreadline-dev xvfb libjack-jackd2-0cd ~- git clone https://github.com/redFrik/supercolliderStandaloneRPI1 --depth 1`
mkdir -p ~/.config/SuperCollidercp supercolliderStandaloneRPI1/sc_ide_conf_temp.yaml ~/.config/SuperCollider/sc_ide_conf.yamlcd supercolliderStandaloneRPI1nano autostart.sh#and change the script to look like this:
#!/bin/bash
./sclang -a -l sclang.yaml ../dragspelFans.scd
nano share/user/startup.scd#and add the following two lines:
OSCFunc({"/home/pi/dragspelFans.scd".load}, \start).permanent= true;
OSCFunc({CmdPeriod.run}, \stop).permanent= true;
mkdir share/user/Extensionsnano share/user/Extensions/DragspelFans.sc#and copy&paste in the following:
//f.olofsson2016-2018 - for controlling 12ch computer fan switch board
DragspelFans {
  var <rpi, num, vals, lastv, <>debug;
  *new {|debug= false, rpi, num= 12|
    ^super.new.initDragspelFans(debug, rpi, num);
  }
  initDragspelFans {|d, r, n|
    num= n;
    if(r.notNil, {
      rpi= r;
    }, {
      try{
        rpi= NetAddr("fans.local", 9999);
      } {|err|
        "could not connect to rpi.\n make sure you are connected to the wifi network 'dragspel'.".warn;
        rpi= NetAddr("127.0.0.1", 9999);  //temp just for testing
      };
    });
    debug= d;
    vals= 0!num;
  }

  setAll {|val= 100|  //val should be 0 to 100
    vals= val!num;
    this.prSend;
  }
  clearAll {
    vals= 0!num;
    this.prSend;
  }
  val {|index, val|  //index should be 0-11, val 0-100
    vals= vals.put(index, val);
    this.prSend;
  }
  arr {|arr|  //arr should be 12 numbers in an array
    vals= arr;
    this.prSend;
  }

  shutdown {
    rpi.sendMsg(\shutdown);
  }
  reboot {
    rpi.sendMsg(\reboot);
  }
  start {
    rpi.sendMsg(\start);
  }
  stop {
    rpi.sendMsg(\stop);
  }

  //--private
  prSend {|v|
    if(debug, {
      vals.postln;
    });
    v= vals.clip(0, 100).round.asInteger;
    if(v!=lastv, {  //filter out repeats
      lastv= v;
      rpi.sendMsg(\pwms, *v);  //send to dragspelFans.py
    });
  }
}
nano ~/dragspelFans.scd#and copy&paste in the following:
//demo autostart script - put your own standalone code in here
d= DragspelFans.new;
Event.addEventType(\fans, {d.val(~index, ~val)});
Pbind(\type, \fans, \dur, 0.5, \index, Pseq([0, 1, 2, 3, 4, 5, 6, 7, 8, 9, 10, 11], inf), \val, Pwhite(0, 100, inf)).play;
crontab -e#and add the following to the end (note no sudo here this time)
@reboot cd /home/pi/supercolliderStandaloneRPI1 && xvfb-run ./autostart.sh
Now sudo reboot and SuperCollider should automatically start the code in dragspelFans.scd. It'll take a while so give it a minute or two.
To test it more run the following SuperCollider code on your laptop...
n= NetAddr("fans.local", 9999);
n.sendMsg(\stop);  //first stop the dragspelFans.scd script
n.sendMsg(\pwms, *[25, 50, 75, 0, 0, 0, 0, 0, 0, 0, 0, 0]);  //set pwm manually

//install the DragspelFans.sc class on your laptop SC and also try the following example code

a= DragspelFans(true);  //might take a moment or two
CmdPeriod.doOnce({a.clearAll});  //optional

//version0 - all on or off
a.setAll;
a.clearAll;
a.setAll(50);  //set all to some value 0-100
a.clearAll;

//version1 - using an array
a.arr([0, 0, 100, 0, 0, 100, 0, 0, 100, 0, 0, 100]);  //turn on some
a.arr([0, 100, 0, 0, 100, 0, 0, 100, 0, 0, 100, 0]);  //turn some other fans
a.arr([30, 0, 0, 40, 100, 0, 40, 0, 0, 80, 0, 0]);  //a few slower
a.clearAll;

//version2 - set index to value
a.val(9, 100);
a.val(9, 0);
a.val(11, 100);
a.val(11, 0);
a.val(11, 60);
a.val(11, 0);

//fade in each fan in order
(
r= Routine.run({
  12.do{|j|
    100.do{|i|
      a.val(j, i);
      0.05.wait;
    };
    100.do{|i|
      a.val(j, 99-i);
      0.05.wait;
    };
  };
});
)
r.stop;

//using patterns
a= DragspelFans.new;
Event.addEventType(\fans, {a.val(~index, ~val)});
Pdef(\test, Pbind(\type, \fans, \dur, 0.125, \index, Pseq([0, 1, 2, 3, 4, 5, 6, 7, 8, 9, 10, 11].scramble, inf), \val, Pwhite(0, 100, inf))).play;
Pdef(\test).stop;

a.start;  //start the dragspelFans.scd script on the rpi again
a.stop;
a.reboot;
a.shutdown;
Or test it using the attached MaxMSP patch.
WiFi SoftAP
This section is optional. It will set up a WiFi access point served from the RPi. Basically taken from www.raspberrypi.org/documentation/configuration/wireless/access-point-routed.md.
sudo apt-get install dnsmasq hostapdsudo systemctl stop dnsmasqsudo systemctl stop hostapdsudo nano /etc/dhcpcd.conf#and add the following to the end:
interface wlan0
  static ip_address=192.168.4.1/24
sudo service dhcpcd restartsudo nano /etc/dnsmasq.conf#and add the following two lines to the bottom:
interface=wlan0
dhcp-range=192.168.4.2,192.168.4.50,255.255.255.0,4h
sudo nano /etc/hostapd/hostapd.conf#and add the following (remember to set passphrase 8-64 characters):
interface=wlan0
driver=nl80211
ssid=dragspel
hw_mode=g
channel=6
wmm_enabled=0
macaddr_acl=0
auth_algs=1
ignore_broadcast_ssid=0
wpa=2
wpa_passphrase=________
wpa_key_mgmt=WPA-PSK
wpa_pairwise=TKIP
rsn_pairwise=CCMP
sudo nano /etc/default/hostapd#and change one line to the following:
DAEMON_CONF="/etc/hostapd/hostapd.conf"
sudo systemctl start hostapdsudo systemctl start dnsmasq
Now sudo reboot on the RPi, log on to dragspel WiFi network from your laptop and try to send some OSC commands.
Updates:
- 180225: major rewrite to use pigpio instead of RPi.GPIO and also Raspbian Stretch instead of Jessie. PWM works much better.