Big remake of this blog as well as my homepage. I decided to rewrite everything using the wonderful Zola engine www.getzola.org - a static site generator.
On the surface it all should look and function about the same as before. I worked hard to keep backward compatibility and to make sure URLs stay the same. I used aliases and a few .htaccess RewriteRules.
Up until now, my site was a mixture of plain HTML and Drupal (the monster). It took quite some time to change everything over, but I think it was worth the trouble.
Also now my homepage finally should look at least decent on mobile.
In MaxMSP there is a great object called [match]. It is especially useful for parsing data from a serial port. In SuperCollider there is nothing like that build-in, but one can do the same with the class extension below.
Bascially this method will match an incoming array of specific bytes where nil means match any value. For example port.match([1, 2, nil, 3]); will return a match for 1, 2, 55, 3 but not for 1, 4, 55, 10.
Save the following in a file called extSerial.sc, move the file to your SuperCollider extensions folder and recompile...
This SuperCollider function automates the process of making seamless loops as shown in this animation...
cross-fading in audacity
i.e. creating continuous loops from buffers following this recipe...
select a few seconds from the end.
fade out the selection.
cut the selection.
paste the selection at time 0.
select a few seconds from the beginning (usually same length as in #1).
fade in the selection.
mix the two tracks.
(
~xfader= {|inBuffer, duration= 2, curve= -2, action|
  var frames= duration*inBuffer.sampleRate;
  if(frames>inBuffer.numFrames, {
    "xfader: crossfade duration longer than half buffer - clipped.".warn;
  });
  frames= frames.min(inBuffer.numFrames.div(2)).asInteger;
  Buffer.alloc(inBuffer.server, inBuffer.numFrames-frames, inBuffer.numChannels, {|outBuffer|
    inBuffer.loadToFloatArray(action:{|arr|
      var interleavedFrames= frames*inBuffer.numChannels;
      var startArr= arr.copyRange(0, interleavedFrames-1);
      var endArr= arr.copyRange(arr.size-interleavedFrames, arr.size-1);
      var result= arr.copyRange(0, arr.size-1-interleavedFrames);
      interleavedFrames.do{|i|
        var fadeIn= i.lincurve(0, interleavedFrames-1, 0, 1, curve);
        var fadeOut= i.lincurve(0, interleavedFrames-1, 1, 0, 0-curve);
        result[i]= (startArr[i]*fadeIn)+(endArr[i]*fadeOut);
      };
      outBuffer.loadCollection(result, 0, action);
    });
  });
};
)

s.boot;

//edit and load a sound file (or use an already existing buffer)
b.free;  b= Buffer.read(s, "~/Desktop/testnoise.wav".standardizePath);

//evaluate the function to create the seamless cross fade
c= ~xfader.value(b);

//try looping it - should loop smoothly and without discontinuities
d= {PlayBuf.ar(c.numChannels, c, loop:1)}.play;
d.release;

//compare with the input file - this will probably have a hickup
d= {PlayBuf.ar(b.numChannels, b, loop:1)}.play;
d.release;

b.free;
c.free;


//--save to disk example with shorter cross fade and done action function.
b.free;  b= Buffer.read(s, "~/Desktop/testnoise.wav".standardizePath);
c= ~xfader.value(b, 0.5, -3, action:{|buf| ("done with buffer"+b).postln});
c.write("~/Desktop/testnoise-looped.wav".standardizePath);
c.free;
b.free;
The SuperCollider code works with any Buffer containing sound files, live sampled or generated sounds. The duration argument set the cross fade length in seconds and with the curve argument one can set curvature.
Note that duration can not be longer than half the duration of the input buffer and a curve of 0.0 or greater will mean that the amplitude will dip in the middle of the crossfade. So it is recommended to bend the curve a bit to get more of an equal power crossfade. -2.0 to -4.0 seem like sensible values.
The function will allocate and return a new Buffer instance and not touch the buffer passed in as an argument.
An action function is optional. The function is asynchronous.
Also, note that the resulting file will be shorter than the original because of the crossfade.
Footnote: I remember learning this trick from Peter Lundén ~20 years ago. He showed it to me on an SGI machine running IRIX, possibly using the Snd sound editor.
With the painlessMesh library, it turned out easy to set up a decentralised mesh network for a few ESP8266 modules. The example below shows how I set it up and how to send and receive OpenSoundControl (OSC) messages. The code also works on an ESP32.
Install the painlessMesh and the OSC libraries for Arduino.
Program a few nodes (ESP8266) so that they all run this code...
//req. libraries: OSC, painlessMesh

#include <Arduino.h>
#include <painlessMesh.h>
#include <WiFiUdp.h>
#include <OSCMessage.h>
#include <OSCData.h>

#define MESH_NAME "networkname" //EDIT mesh name
#define MESH_PASS "networkpass" //EDIT password
#define MAX_CONN 4 //EDIT ESP32 can have more than ESP8266

#define INPORT 19998 //OSC in port
#define OUTPORT 57120 //OSC out port (SC)

IPAddress outIP;
WiFiUDP Udp;
painlessMesh mesh;

void setup() {
  pinMode(LED_BUILTIN, OUTPUT);
  mesh.init(MESH_NAME, MESH_PASS, 5555, WIFI_AP_STA, 1, 0, MAX_CONN);
  Udp.begin(INPORT);
}

void pingFunc(OSCMessage &inMsg) {
  digitalWrite(LED_BUILTIN, 1 - digitalRead(LED_BUILTIN));  //toggle led
  OSCMessage outmsg("/pong");
  outmsg.add(mesh.getNodeId()); //uint32
  IPAddress ip;
  ip= mesh.getStationIP(); //0.0.0.0 if current base station
  outmsg.add(ip[0]);
  outmsg.add(ip[1]);
  outmsg.add(ip[2]);
  outmsg.add(ip[3]);
  ip= mesh.getAPIP();
  outmsg.add(ip[0]);
  outmsg.add(ip[1]);
  outmsg.add(ip[2]);
  outmsg.add(ip[3]);
  Udp.beginPacket(outIP, OUTPORT);
  outmsg.send(Udp);
  Udp.endPacket();
}

void loop() {
  mesh.update();

  int packetSize= Udp.parsePacket();
  if (packetSize) {
    OSCMessage inMsg;
    while (packetSize--) {
      inMsg.fill(Udp.read());
    }
    if (!inMsg.hasError()) {
      outIP= Udp.remoteIP();
      inMsg.dispatch("/ping", pingFunc);
    }
  }
}
After that power up the nodes and a new WiFi network should show up.
Connect a laptop to the new mesh network and take note of the IP number assigned.
Run the test code below on the laptop. It will broadcast a \ping OSC message and listen for \pong replies.
The test code is for SuperCollider but any program that can send OSC should work.
(
OSCFunc({|msg| msg.postln}, \pong);
NetAddr.broadcastFlag= true;
NetAddr("10.214.190.255", 19998).sendMsg(\ping);  //EDIT laptop ip number but leave 255 as the last number
)
The painlessMesh library will for sure come in handy when I need a network without a WiFi router, or for when trying to cover a larger area.
A major drawback though seems to be that the maximum number of nodes that can be used is really low. Apparently, an ESP8266 can only handle 5 (TCP/IP) connections at the same time and an ESP32 about three times that. And that is not very many.
These instructions show how to build, package and install SuperCollider, sc3-plugins and jackd for piCore - a variant of TinyCoreLinux for the Raspberry Pi.
introduction
piCore has many advantages over the common Raspbian system. It will boot a lot faster, is extremely light-weight and is easy to customise. And because the whole system always resides in RAM, SD card wear is minimal.
Its immutable-by-default design means one can unplug the power to the Raspberry Pi without performing and waiting for a proper shutdown nor risking corrupting the SD card. It also allows one to experiment without being afraid of messing up. A simple reboot will take the system back to a known state. For changes to be persistent, one must deliberately write them to the SD card (using the command filetool.sh -b).
Some drawbacks are that piCore is more advanced to install and configure and that much common Linux software is missing from the built-in package manager (one will have to compile it oneself - hence this guide).
burn the zip file to the SD card using for example balenaEtcher
put the SD card in the RPi and connect ethernet and 5V power
On the laptop, open a terminal and run the following commands:
ping 192.168.1.255  #first broadcast ping (stop with ctrl+c)
arp -a  #figure out which IP address the RPi has (here 192.168.1.13)
ssh tc@192.168.1.13  #default password: piCore

sudo fdisk -u /dev/mmcblk0  #then press the following keys in order to delete and recreate partition2
 p  #note start of partition2 - StartLBA - usually 77824
 d
 2
 n
 p
 2
 77824  #enter start of partition2 from above
 <RET>  #type return to accept suggestion
 w  #write

filetool.sh -b
sudo reboot

ssh tc@192.168.1.13  #pass: piCore

sudo resize2fs /dev/mmcblk0p2  #resize partition2
jackd
Assuming piCore is now installed and partition2 resized like above...
#download and install build dependencies
tce-load -wil cmake compiletc python squashfs-tools libudev-dev libsndfile-dev readline-dev libsamplerate-dev fftw-dev git

#download and compile jackd
cd /tmp
git clone git://github.com/jackaudio/jack2 --depth 1
cd jack2
wget https://waf.io/waf-2.0.12
chmod +x waf-2.0.12
./waf-2.0.12 configure --alsa
./waf-2.0.12 build
sudo ./waf-2.0.12 install > /tmp/jack2_tmp.list

#create the jackd tcz extension package
cd /tmp
cat jack2_tmp.list | grep "/usr/local/" | grep -v "/share/man/\|.h \|.pc " | awk '{print $3}' > jack2.list
tar -T /tmp/jack2.list -czvf /tmp/jack2.tar.gz
mkdir /tmp/pkg && cd /tmp/pkg
tar -xf /tmp/jack2.tar.gz
cd ..
mksquashfs pkg/ jack2.tcz
sudo mv jack2.tcz ~
rm -rf /tmp/pkg
tce-load -i ~/jack2.tcz
jackd  #check that it is working
On the laptop, open another terminal window and download the resulting compressed jackd package:
Now that the three tcz packages are created and downloaded to the laptop, we can erase the SD card and start afresh. (It is possible to continue working with the same piCore install, but unused build dependencies would waste some space).
restart and install
(for future installs you can skip all of the above and start here assuming you have kept the .tcz packages)
trash the old system and burn piCore-9.0.3.zip to the SD card again
put the SD card in the RPi and connect ethernet and 5V power
On the laptop, open a terminal and run the following commands:
ping 192.168.1.255  #first broadcast ping (stop with ctrl+c)
arp -a  #figure out which IP address the RPi has (here 192.168.1.13)
ssh-keygen -R 192.168.1.13  #resets the ssh keys to be able to log in again
ssh tc@192.168.1.13  #default password: piCore

sudo fdisk -u /dev/mmcblk0  #then press the following keys in order to delete and recreate partition2
 p  #note start of partition2 - StartLBA - usually 77824
 d
 2
 n
 p
 2
 77824  #enter start of partition2 from above
 <RET>  #type return to accept suggestion
 w  #write

filetool.sh -b
sudo reboot

ssh tc@192.168.1.13  #pass: piCore

sudo resize2fs /dev/mmcblk0p2  #resize partition2

#install dependencies
tce-load -wi nano alsa alsa-utils libsamplerate libudev readline git fftw
On the laptop, open another terminal window and upload the three compressed packages:
cd ~/Downloads
scp jack2.tcz supercollider.tcz sc3-plugins.tcz tc@192.168.1.13:
Back on the Raspberry Pi...
cd ~
mv jack2.tcz supercollider.tcz sc3-plugins.tcz /mnt/mmcblk0p2/tce/optional/
echo jack2.tcz >> /mnt/mmcblk0p2/tce/onboot.lst
echo supercollider.tcz >> /mnt/mmcblk0p2/tce/onboot.lst
echo sc3-plugins.tcz >> /mnt/mmcblk0p2/tce/onboot.lst
echo -e "\nsudo /usr/local/sbin/alsactl -f /home/tc/mysound.state restore" >> /opt/bootlocal.sh

#autostart - optional
nano autostart.sh  #add the following lines
  #!/bin/sh
  jackd -P75 -p16 -dalsa -dhw:0 -r44100 -p1024 -n3 &
  sclang /home/tc/mycode.scd
chmod +x autostart.sh

nano mycode.scd  #add the following lines
  s.waitForBoot{
    {SinOsc.ar([400, 404], 0, 0.5)}.play;
  };

nano /opt/bootlocal.sh  #add the following lines to the end
  echo performance | tee /sys/devices/system/cpu/cpu*/cpufreq/scaling_governor
  /home/tc/autostart.sh &

#IMPORTANT - make the changes permanent
filetool.sh -b

sudo reboot
The piCore system should now have SuperCollider installed and (optionally) start at boot.
volume
To adjust the volume log in and run the following commands...
alsamixer  #set volume with arrow keys, ESC to exit
alsactl -f /home/tc/mysound.state store  #save in custom alsa settings file
filetool.sh -b  #make permanent
notes
for RPi1 and RPi Zero you should probably get the armv6 version.
for RPi2 and newer get the armv7 version (even though the files seem identical).
running the make command with flag -j3 will usually just result in a out-of-memory freeze.
avahi is not activated because libavahi-client-dev is not available for piCore - maybe later.
waf-2.0.12 seems to be the newest version that can build jack2.
jackd and SuperCollider will be running as root when autostarting.
the start-up time from applying power to SuperCollider is making sound is ~20 seconds.
after the first backup (filetool.sh -b) the ssh-keygen -R will not be needed any longer.
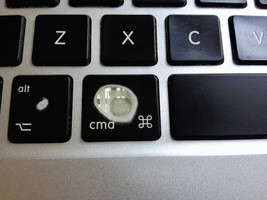
MacBook Pro mid-2015 keyboard after some hard use of the cmd key. My habits shining through.
keyboard closeup
The left side shift and the three up/down/right arrow keys also have this nice transparency look. But strangely enough, the left arrow key must not have been used much.
A Human Interface Device (HID) to Open Sound Control (OSC) converter for macOS written in Python3.
The program can send OSC to any IP and port but by default, it will send to 127.0.0.1 (localhost) on port 57120 (SuperCollider).
Here is a binary build... HIDtoOSC.zip (macOS, 64bit, 5.3MB)
To run it start Terminal.app and type...
cd ~/Downloads
./HIDtoOSC
That should list available HID devices on your system. After that, you will probably see a warning that it failed to open the default device.
So to open and start reading data from any of your own devices you will need to give the correct vendor id and product id as arguments.
usage: HIDtoOSC [-h] [-V] [--vid VID] [--pid PID] [--ip IP] [--port PORT]
                [--rate RATE] [--debug]

optional arguments:
  -h, --help     show this help message and exit
  -V, --version  show program version
  --vid VID      set HID vendor id
  --pid PID      set HID product id
  --ip IP        set OSC destination IP
  --port PORT    set OSC destination port
  --rate RATE    update rate in milliseconds
  --debug        post incoming HID data
example - USB keyboard
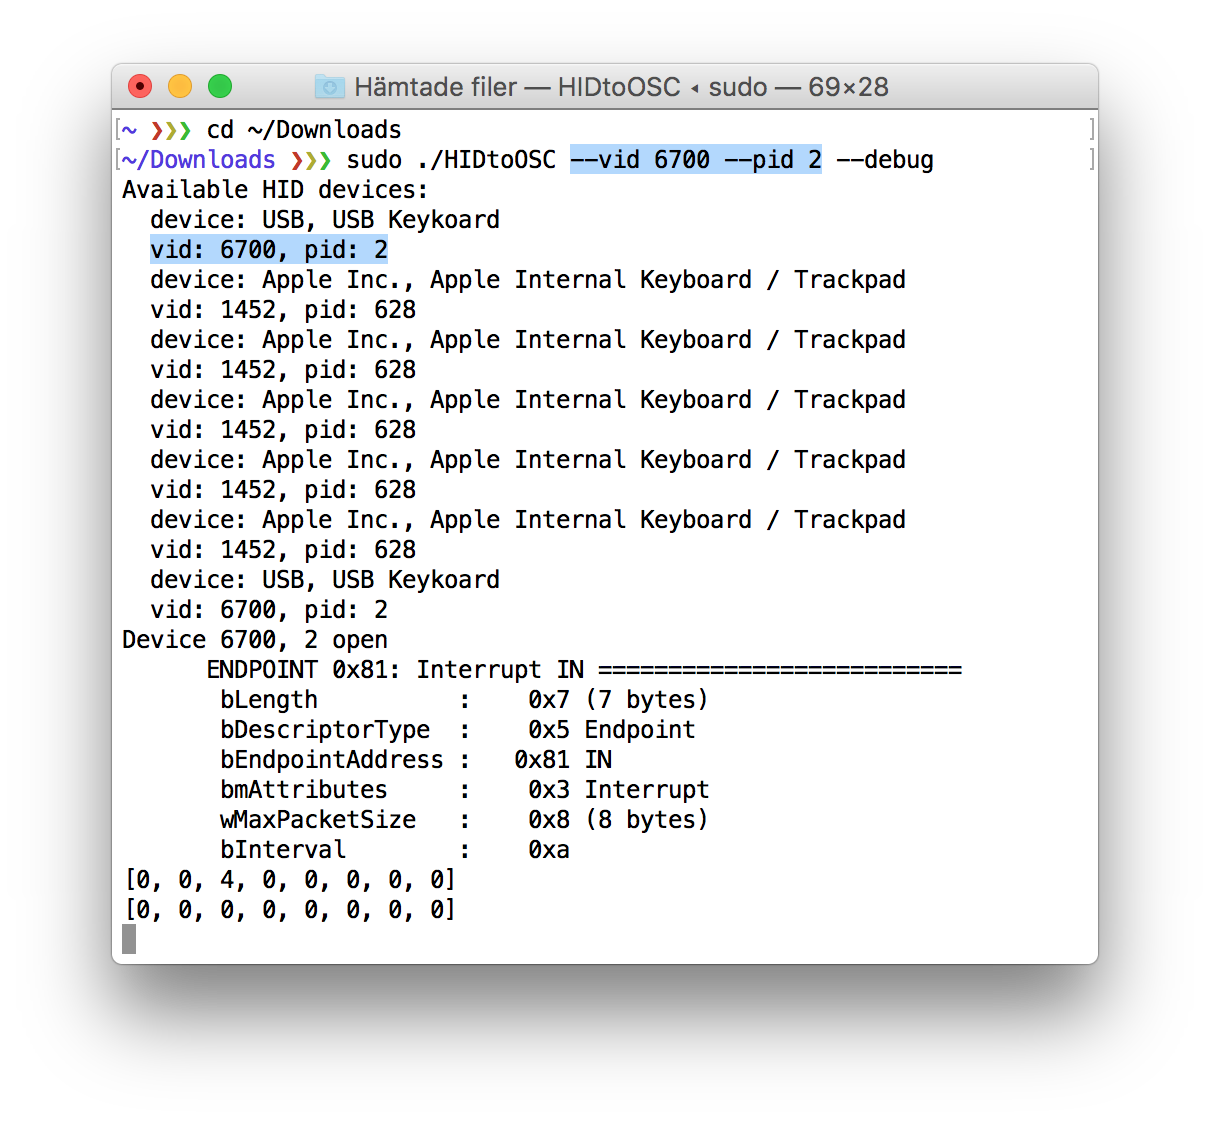
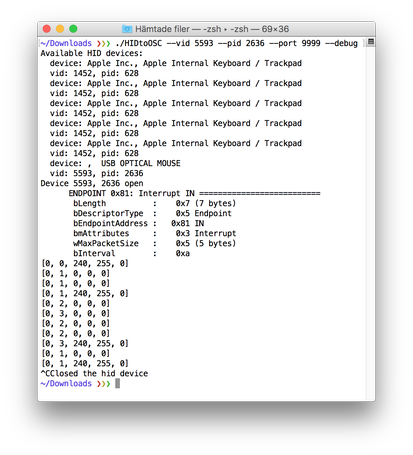
Here is an example that shows how to connect to an external generic USB keyboard with the vendor and product id 6700, 2.
NOTE: for security reasons sudo is needed when accessing keyboards but not for accessing most other devices (gamepads, joysticks, mice)
Some times you will need to run the program a few times before the HID is claimed. Stop the program with ctrl+c
In the example, the key A is pressed and released, but all HID will use their own data format. The --debug flag makes the program print out the incoming data.
receiving OSC
In SuperCollider we can receive the data as an OSC message. Test it by running the line...