Arduino Programming via Soundcard
With lots of study of the AudioBoot_V2_0 Java code by Chris at roboterclub-freiburg.de, I managed to write SuperCollider code for uploading sketches to an Arduino via the soundcard. No FTDI chip needed!
It's a very cheap solution for programming barebone Arduinos (well, ATmega168 microcontrollers really). You only need a few resistors, a capacitor and a mega168. The only difficult part is to initialize this microcontroller by burning the special bootloader on to it. This requires an AVR programmer of some sort (STK500, USBtinyISP etc).
The preparation steps are as follows...
- Burn the bootloader on to a mega168
- Build the barebone circuit
- Prepare the Arduino IDE
- Install the RedArduino class
After that one can compile HEX files in the Arduino IDE and upload them using SuperCollider and a standard audio cable.
1. Burn the bootloader on to a mega168
The trick behind all this is the special sound enabled bootloader that I found here... www.hobby-roboter.de/forum/viewtopic.php?f=4&t=127. I downloaded the AudioBoot_V2_0.zip file and used my STK500 AVR programmer together with the great AVR Crosspack. The terminal command I used for burning the bootloader was the following...
avrdude -v -p m168 -b 115200 -P /dev/tty.PL2303-000013FA -c stk500v2 -U flash:w:/Users/asdf/arbeten/sc/scAudioino/AudioBoot_V2_0/Atmega_Source/chAudioBoot_ATMEGA168_IN_PD1_LED_PB5.hex -U lfuse:w:0xE2:m -U hfuse:w:0xDF:m -U efuse:w:0xFA:m
2. Build the barebone circuit
Then I built a minimal and barebone Arduino circuit after the schematics found here... www.hobby-roboter.de/forum/viewtopic.php?f=4&t=128&p=531. Again credit to Chris.
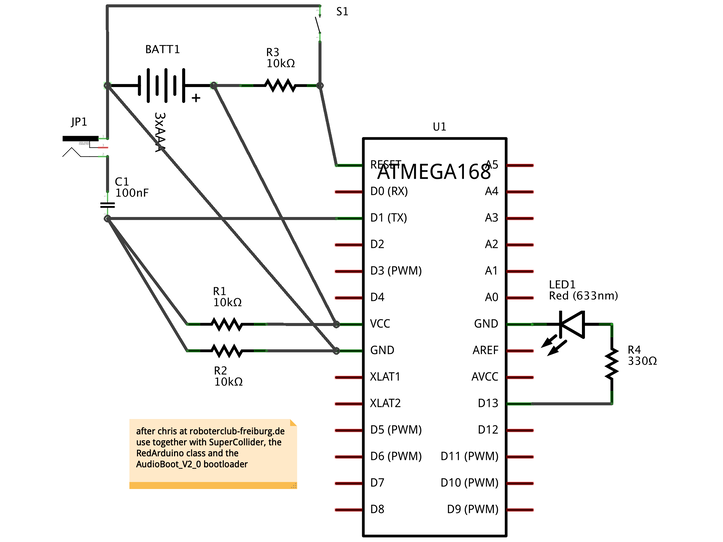


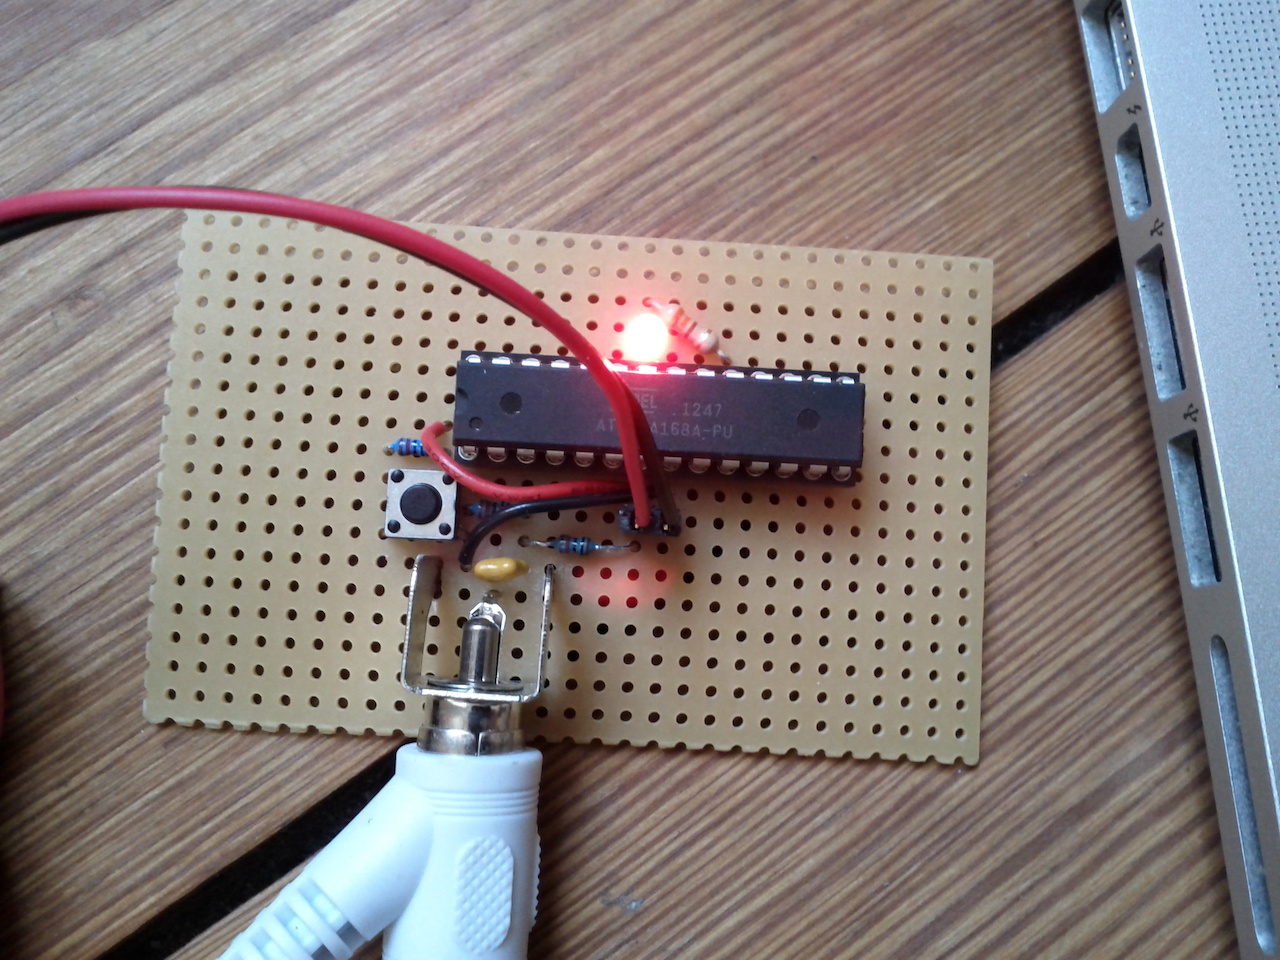
I run it off 4.5V (3 batteries) but it could also be powered from the USB port.
3. Prepare the Arduino IDE
To compile HEX files for this barebone Arduino, I needed to set up a custom board in the Arduino IDE. One way to do this is to create a new text file called boards.txt and put it inside a new folder in the Arduino/hardware folder. on macOS that could be something like ~/Documents/Arduino/hardware/BareBones/boards.txt.
The boards.txt should contain the following...
minimal168.name=ATmega168 bare bone (internal 8 MHz clock)
minimal168.upload.speed=115200
minimal168.bootloader.low_fuses=0xE2
minimal168.bootloader.high_fuses=0xDD
minimal168.bootloader.extended_fuses=0×00
minimal168.upload.maximum_size=16384
minimal168.build.mcu=atmega168
minimal168.build.f_cpu=8000000L
minimal168.build.core=arduino:arduino
minimal168.build.variant=arduino:standard
Then restart the Arduino IDE and under the boards menu, there should be a new option with mega168 and 8 MHz internal clock. I make sure this board is selected every time before compiling HEX files for sound uploading.
Another thing that needs to be done is to enable 'verbose compile' in the Arduino IDE preferences. That will print out the file path of the HEX file each time you compile a sketch.
4. Install the RedArduino class
I wrote a couple of classes for SuperCollider to help with the encoding and signal generation of HEX files. They're found in my redSys quark (under redTools) and are most easily installed from within SuperCollider itself with these commands...
Quarks.install("redSys"); //install. recompile after this
There are two helper classes and one main class. The RedIntelHex class parses HEX files and RedDifferentialManchesterCodeNegative helps to encode the signal as differential manchester code. The main class RedArduino figures out the paging of data and generates a bitstream that is played back using demand rate UGens.
Uploading
I upload sketches by compiling them in Arduino IDE (click verify - not upload) and copy&paste the file path of the resulting HEX file into SuperCollider and the RedArduino's read method. I connect the left sound output channel to the barebone Arduino, put my mac laptop volume to ~80%. Last I press the reset button on the circuit and quickly (within seconds) call the upload method in SuperCollider. The led should blink slowly directly after a reset, and fast when receiving data.
Here's a video demonstrating how to do it. I'm just uploading the simple Blink example. Near the end, you will also hear how that sounds.
There's also some SuperCollider code I wrote (github.com/redFrik/udk09-Bits_and_Pieces/blob/master/udk130523/extras/uploadingArduino.scd) that will do the same thing but without the need of the redSys quark classes.