Solar Powered SuperCollider
Here's how to run SuperCollider on power coming from the sun...
The main component is a Raspberry Pi Zero with WiFi that at startup creates a wireless access point, starts jackd+SuperCollider and launches a default sound patch.
To play around with the system and change the default sound log on to the access point with a laptop and start live coding SuperCollider via the terminal or use the standard SC-IDE via VNC. One can for example also set up a couple of OSC responders and let friends log on with their phones to control sounds.

The connections are pretty straightforward...
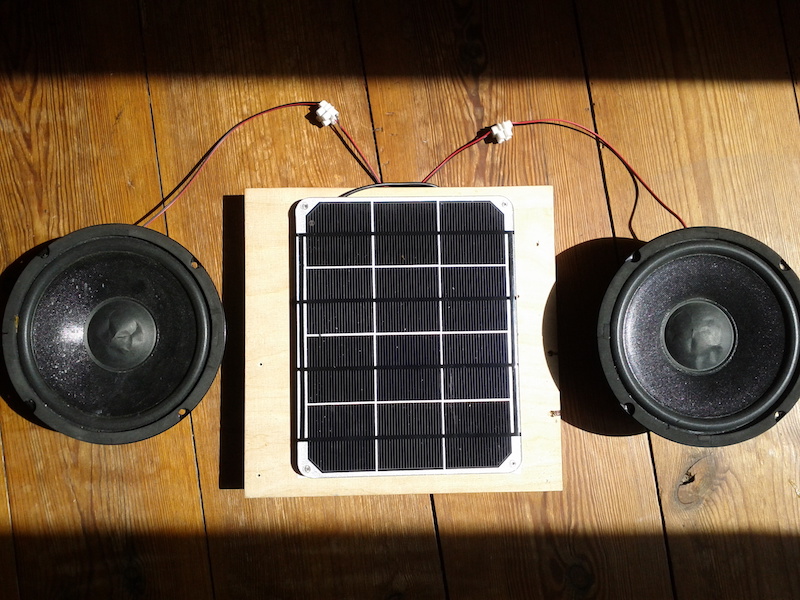
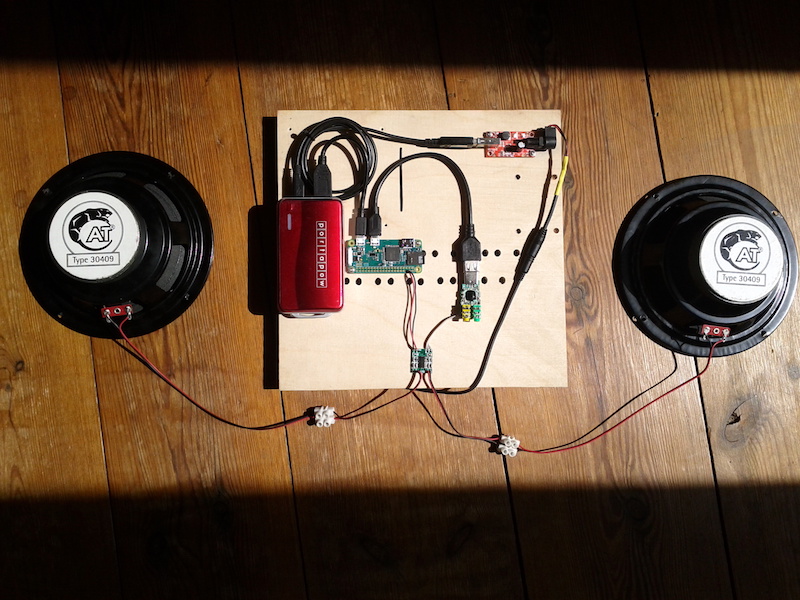
solarpanel -> dcdc converter -> battery -> rpi0 -> soundcard -> amplifier -> speaker(s)
The DC-DC converter is taking the higher voltage coming out of the solar panel (~6V) and turns it into a stable 5V. This is then either charging the battery, or directly powering the Raspberry Pi Zero. Note that the amplifier also needs 5V and here I have taken that from pins 4 and 6 on the RPi.
The power bank battery is optional and can be omitted but then the solar panel will have to stay in the sun at all times - else the system will turn off or reboot when the power from the panel drops. The battery acts as a reservoir for when clouds are passing by but not only that - it also lets the system be used for a couple of hours in the evening.
Material/modules needed:
- RPi Zero W
- 8GB micro SD card
- 5V USB power bank (best if it can charge and output power at the same time)
- a 6V, 6 Watt solar panel (www.adafruit.com/product/1525)
- DC-DC converter (www.olimex.com/Products/Power/DCDC6-16-TO5)
- USB sound adapter
- PAM8403 stereo amplifier module
- two full-range speakers
- wooden board, double adhesive tape + various cables and screws
Download Raspbian Jessie (here Jessie Desktop 2017-07-05-raspbian-jessie.zip) and burn it onto the SD card with balenaEtcher.
Do the usual setup (change default password, activate SSH), optionally activate VNC and then install supercolliderStandaloneRPI1.
To set up a WiFi access point do the following (basically the same as this tutorial)...
sudo apt-get install dnsmasq hostapd
sudo systemctl stop dnsmasq
sudo systemctl stop hostapd
sudo nano /etc/dhcpcd.conf  #and add...
  denyinterfaces wlan0
sudo nano /etc/network/interfaces  #and make sure wlan0 looks like...
  allow-hotplug wlan0
  iface wlan0 inet static
    address 192.168.4.1
    netmask 255.255.255.0
    network 192.168.4.0
sudo service dhcpcd restart
sudo ifdown wlan0
sudo ifup wlan0
sudo nano /etc/dnsmasq.conf  #and add the following...
  interface=wlan0
  dhcp-range=192.168.4.2,192.168.4.20,255.255.255.0,24h
sudo nano /etc/hostapd/hostapd.conf  #and add the following...
  interface=wlan0
  driver=nl80211
  ssid=solarsc
  hw_mode=g
  channel=7
  wmm_enabled=0
  macaddr_acl=0
  auth_algs=1
  ignore_broadcast_ssid=0
  wpa=2
  wpa_passphrase=mypass12345
  wpa_key_mgmt=WPA-PSK
  wpa_pairwise=TKIP
  rsn_pairwise=CCMP
sudo nano /etc/default/hostapd  #and change to the following...
  DAEMON_CONF="/etc/hostapd/hostapd.conf"
sudo service hostapd start
sudo service dnsmasq start
Last change the file mycode.scd and add this default sound (tweet0340)...
s.waitForBoot{
  play{a=SinOscFB;Mix(AllpassN ar:a.ar(midicps(Duty.ar(c=a.ar(1/[12,8])+3/24,0,Dseq([0,8,5,1,5,4,5]*round(c*18),inf))+60),c*2)/4)}// #SuperCollider
};
If the sound is distorting try lowering the volume in alsamixer.