The laptop is set up to dual-boot Mac OS X 10.6.8 Snow Leopard and FreeBSD (13.0 at the moment) via the rEFInd boot manager. Though I end up using OS X most of the time just because it boots a lot faster. The battery pack is dead so I need to power it on and off each time I use it.
SpiderWeb is my browser of choice, but I also have ArticFox and InterWeb installed. Performance is alright and I can stream radio and play YouTube videos in 480p - my preferred quality setting. In FreeBSD, I run a recent version of Firefox.
The computer is connected to a set of external computer speakers - a 2.1 subwoofer system - that I got for free and had laying around.
Internet access is handled via WiFi (AirPort Extreme) and the DVD burner (SuperDrive), Bluetooth, microphone, speakers, trackpad, sensors and the camera (iSight) all work.
But this laptop has had a hard life and was with me on many adventures. Quite a few things were broken and I had to repair the keyboard, battery, power supply and fans.
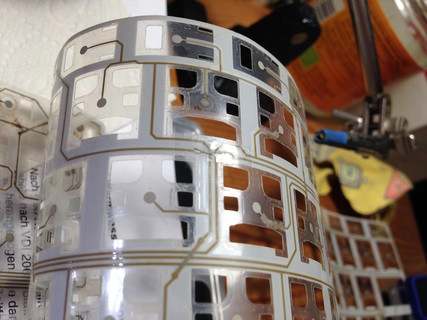
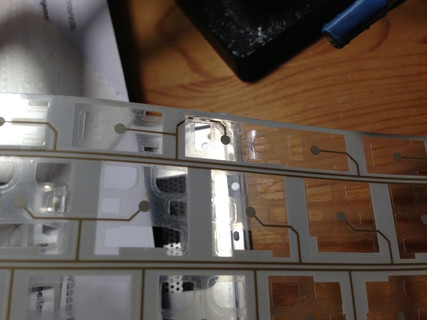
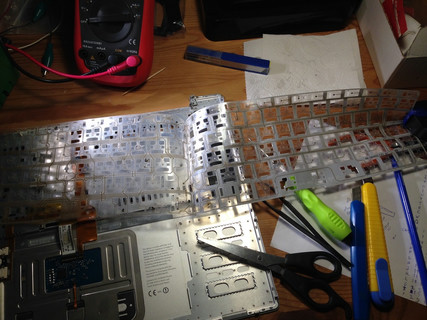
Keyboard repair
The machine suffered a beer accident in Japan in 2008 and after that about a third of the keys on the keyboard wouldn't work. I kept using it for several years with the help of an external USB keyboard.
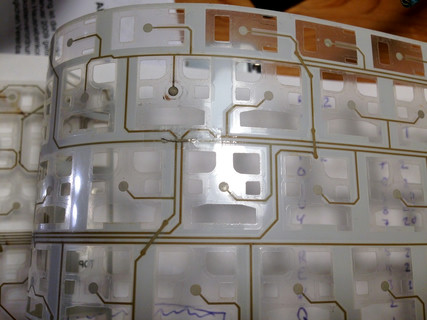
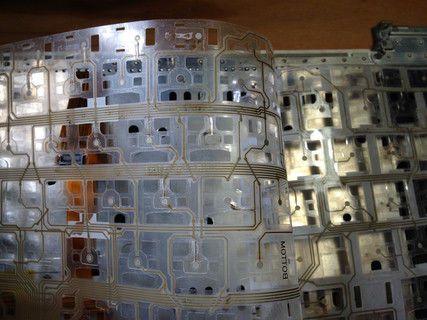
Last winter I spent a lot of time trying to finally repair this broken keyboard using a multimeter, tape and thin conductive wire...
Many tracks were broken and corroded but amazingly I got it to work! At one moment, all keys functioned except the led in the caps-lock that wouldn't light up. Also, during the repair, I broke off one of the springy supports for the space bar, so it tilted and didn't react on the left-hand side. Very irritating and impossible to fix (at least by me).
And my repair attempt didn't last. After about a month, a few keys started acting funny, intermittent and finally wouldn't work at all. When even more keys broke, I gave up and ordered a replacement keyboard for this model (A1211) on AliExpress.
Fans repair
The right-hand side fan needed repair. It was stuck as the casing somehow got dented. I cleaned both fans thoroughly and added new silicone grease.
Memory upgrade
I maxed out the RAM by buying two 2 GB memory modules on eBay. There is an issue with this machine though as it can not address more than 3 GB. So even if I now have 4 GB installed, only 3 can be used.
Other things
added new thermal paste
removed dead battery pack
replaced PRAM coin cell
replaced the spinning hard disk with an SSD
the MagSafe cable was broken. I bought a new one, cracked open the power supply and soldered the new one in place
Conclusion MacBook Pro
The machine uses between 20 and 35 Watts in standard operation, and the cost of fixing it up was around €40 in total. It gets a lot of use and will probably last many years to come.
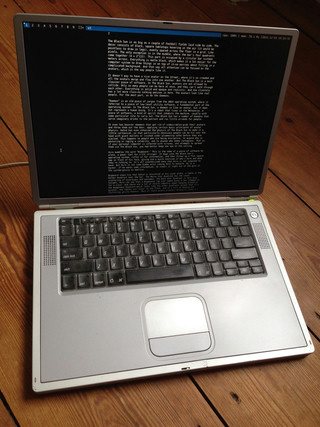
Last autumn I spent time restoring my old computers. I wanted to start using them for various things again. One, a 20-years old Titanium PowerBook G4 667 MHz, was in good shape and didn't need much work. My idea was to have it as an offline laptop - a distraction-free machine for reading e-books and playing around with a BSD operating system.
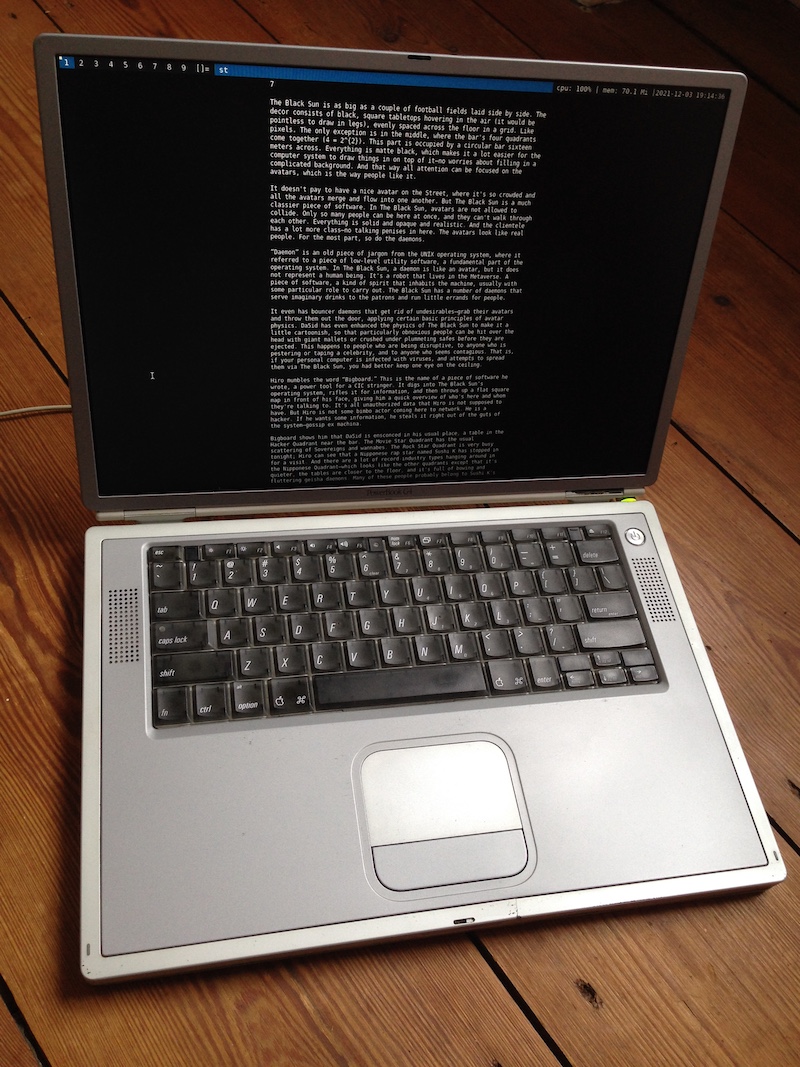
offline laptop running OpenBSD
I thoroughly cleaned the keyboard and removed dust from inside the fan and air vents. I also replaced the old thermal paste with new. That required some work because to get access to the CPU and heatsink on these models one need to unscrew and disconnect nearly everything inside. But it was interesting and worth the effort. This computer now runs cool and the fan hardly ever turns on. The good guide on iFixit was helpful.
In the process, I also replaced the hard disk with a 16 GB Asiproper mSATA SSD and an mSATA to 2,5" 44pin IDE adapter. That made the laptop faster overall and also made it run much quieter. The old spinning hard disk was quite noisy. There is now only a tiny vining sound during operation (from a coil I believe), but that does not bother me much.
The laptop battery was dead so I removed it and recycled the cells. It is a slight annoyance to have the laptop plugged in with the power adapter cable at all times. I might try to reconstruct the battery pack with new LiPo 18650 cells.
Another drawback with an old PPC machine like this is that its current consumption is fairly high - at least compared to how slow it computes. In use, this laptop draw 21-35 Watts depending on the screen brightness and what I do with the computer, and when completely powered off 3.8 Watts! So I make sure to always unplug it when I'm done using it.
The built-in speakers and the matte display are okay, the DVD player is working and the trackpad and keyboard are very nice to use. It is a joy to type on this laptop and without the battery, the machine doesn't weigh much.
The display hinges feel good but I take extra care not to twist or put stress on the lid as I know these can break on these PowerBook models.
There is 512 MB of RAM installed (2 x 256 modules). I thought of buying more and upgrading to the maximum of 1 GB, but these types of SO-DIMM memory modules are both hard to find and I feel I can't justify the cost as the operating system I'm running (see below) uses less than 70 MB.
Whenever I need to transfer files or get network access I connect an ethernet cable. There is no WiFi or Bluetooth. It should be inconvenient to get online - it's a feature.
OpenBSD
For the operating system, I picked OpenBSD. Mainly because I wanted to study and learn more about it, but also because it is still updated and supported for PPC 32-bit machines.
In the process, I also tried FreeBSD, MintPPC, VoidLinuxPPC, Debian and Adelie Linux but encountered various problems. Nothing worked as good and was as easy to install as OpenBSD. Mac OS9 or OSX (10.4 perhaps) would have been other options, but I already have several machines that run these systems.
The following instructions show how to set up OpenBSD version 7.0 on a macppc laptop using another laptop plus a USB stick to prepare the installer.
Note: The internal hard disk will be erased and overwritten.
insert an empty USB stick and format it as FAT MBR (I used Disk Utility)
write the iso file to the USB stick WARNING: This is dangerous! Double-check that you are targeting the USB stick (here disk2) and not some other drive
diskutil list #and take note of the disk number of the USB stick (here disk2)
sudo diskutil umount /dev/disk2s1 #make sure disk2s1 the USB stick
sudo dd if=~/Downloads/install70.iso of=/dev/rdisk2 bs=1m #make sure rdisk2 is the USB stick
Now move the USB stick over to the PowerBook for installation and...
power on while holding down the keys O+F+CMD+ALT. This should take you into Open Firmware
boot from the USB stick iso with the following command...
boot usb0/disk:,ofwboot 7.0/macppc/bsd.rd
If that does not work try changing from usb0 to usb1 in the line above. Also, note the space after ofwboot and perhaps edit 7.0 to match the version you downloaded.
The laptop should now have booted and started the OpenBSD installer.
Installation
This is easy. Just answer some questions accepting the default answer for the most part. For this PowerBook, there were only two things I choose to do differently: said yes to start X window system by xenodm and said yes to continue without verification.
i #for Install
HOSTNAME #system hostname?
[gem0] #network interface
[autoconf] #IPv4 address
[none] #IPv6 address
[done]
PASSWORD #for root account
[yes] #start sshd by default?
yes #X window system started by xenodm?
[no] #change default console?
USERNAME #for user account
FULL NAME
PASSWORD
[no] #allow root ssh login?
[wd0] #wd0 is internal SSD disk, sd0 is USB
[MBR]
[yes]
[whole] #use whole disk
[a] #auto layout
[done]
disk #location of sets?
no #already mounted
[sd0] #which disk contains the install media?
[7.0/macppc] #pathname to the sets?
[done]
yes #continue without verification?
[done]
Europe/Berlin #enter a valid timezone
[done]
[reboot] #press and hold down O+F+CMD+ALT
Back in Open Firmware set up a few environment variables (it also seem to work without these but for safety)...
printenv
setenv auto-boot? true
setenv skip-netboot? true #optional - speeds up booting a little bit
setenv boot-device hd:,ofwboot
shut-down #remove the USB stick, start again and log in as USER
Customisation
Now OpenBSD should be up and running. Here are a few things I did to set up and customise my system...
Allow doas, do not ask for password for reboot and shutdown:
Replace USER with your username from above...
su
echo 'permit persist keepenv USER' >> /etc/doas.conf
echo 'permit nopass USER as root cmd reboot' >> /etc/doas.conf
echo 'permit nopass USER as root cmd shutdown' >> /etc/doas.conf
exit
Save the SSD a bit by enabling TRIM:
doas cp /etc/fstab /etc/fstab.bak
doas sed -i 's/rw/rw,softdeb,noatime/g' /etc/fstab
Update the system:
This requires internet access.
doas fw_update -a #optional: install non-free firmware (I didn't)
doas syspatch #patch the system
doas pkg_add -Uuv #update apps and more
doas reboot
Install suckless window manager, terminal, status and launch menus:
It is also possible to skip this section and instead install a more traditional desktop environment like Xfce.
doas pkg_add git nano

git clone https://git.suckless.org/dwm
git clone https://git.suckless.org/dmenu
git clone https://git.suckless.org/st
git clone https://git.suckless.org/slstatus

cd ~/dwm
nano config.mk #uncomment FREETYPEINC = $(X11INC)/freetype2
ftp https://dwm.suckless.org/patches/functionalgaps/dwm-functionalgaps-6.2.diff
git apply dwm-functionalgaps-6.2.diff #optional: patch dwm to use gaps
cp config.def.h config.h
nano config.h #edit the resizemouse line to use SHIFT+ALT+MOUSE for resizing windows
  { ClkClientWin, MODKEY|ShiftMask, Button1, resizemouse, {0} },
make
doas make install

cd ~/dmenu
nano config.mk #uncomment FREETYPEINC = $(X11INC)/freetype2
cp config.def.h config.h
nano config.h #optional: edit number of lines in launcher...
  static unsigned int lines = 12
make
doas make install

cd ~/st
nano config.mk #uncomment CPPFLAGS etc. (4 lines)
ftp https://st.suckless.org/patches/alpha/st-alpha-0.8.2.diff
git apply st-alpha-0.8.2.diff #optinal: patch terminal for transparency
make
doas make install

cd ~/slstatus
nano config.mk #and add -lsndio where it says OpenBSD
cp config.def.h config.h
nano config.h #optional: edit status bar...
  { cpu_perc, " cpu: %s%% |", NULL },
  { ram_used, " mem: %s |", NULL },
  { datetime, "%s", "%F %T" },
make
doas make install
Unfortunately, slstatus does not work well on this old PowerBook. E.g. cpu_perc returns a constant of 100% and the sensor for temperature is not found.
Turn off additional console window at login:
doas sed -i 's/xconsole/#xconsole/' /etc/X11/xenodm/Xsetup_0
Switch to ZSH shell:
doas pkg_add zsh
chsh -s zsh
Set up the .xsession file:
Adapt en and US below to match your keyboard layout and preferred language.
nano ~/.xsession #and add the following

  export ENV=$HOME/.zshrc
  export LC_CTYPE=en_US.UTF-8
  setxkbmap us
  xidle -program "/usr/X11R6/bin/xlock -mode blank -lockdelay 10 -timeelapsed" -timeout 480 &
  xsetroot -solid black
  slstatus &
  exec dwm
Log out and in again to make the changes work.
Set a wallpaper:
Optional: with feh it is easy to set a desktop background. compton together with the alpha-patched st from above results in a semi-transparent terminal.
doas pkg_add compton feh
nano ~/.xsession #edit and replace xsetroot with the following two lines

  compton &
  ~/.fehbg &

mkdir -p ~/.config
ftp https://wallpapercave.com/wp/QjyrBg9.png #or some other png or jpg
mv QjyrBg9.png ~/.config/wallpaper.png
feh --bg-fill ~/.config/wallpaper.png
Install pdf and epub readers:
doas pkg_add zathura-pdf-poppler epr-reader
Reduce the boot time:
A bit of an annoyance is that OpenBSD takes a long time to boot. 1 minute 45 seconds in my case. This is mainly due to security features that for example shuffle around the address space layout at each boot (ASLR).
To save 25 seconds in boot time I turned off ASLR with the command...
doas rcctl disable library_aslr
This is of course not recommended, but for a machine like this that is mainly offline and for what I'm using it for, I believe it is alright.
Conclusion TiBook
All in all, I am very happy with this laptop and that it continues to function and be of use after 20 years.
The cost of fixing this up - the new mSATA SSD plus IDE adapter - was around €20.
The instructions here below are for piCore12.0 (32-bit) while the old post was for piCore-9.0.3. The main difference between the two is that we no longer need to build jack2 ourselves. jack and jack-dev are now included in the piCore repository. This version also compiles SuperCollider with avahi support.
introduction
piCore has many advantages over the common Raspbian system. It will boot a lot faster, is extremely light-weight and is easy to customise. And because the whole system always resides in RAM, SD card wear is minimal.
Its immutable-by-default design means one can unplug the power to the Raspberry Pi without performing and waiting for a proper shutdown nor risking corrupting the SD card. It also allows one to experiment without being afraid of messing up. A simple reboot will take the system back to a known state. For changes to be persistent, one must deliberately write them to the SD card (using the command filetool.sh -b).
Some drawbacks are that piCore is more advanced to install and configure and that much common Linux software is missing from the built-in package manager (one will have to compile it oneself - hence this guide).
burn the zip file to the SD card using for example balenaEtcher
put the SD card in the RPi and connect ethernet and 5V power
On the laptop, open a terminal and run the following commands:
ping 192.168.1.255  #first broadcast ping (stop with ctrl+c)
arp -a  #figure out which IP address the RPi has (here 192.168.1.13)
ssh tc@192.168.1.13  #default password: piCore

sudo fdisk -u /dev/mmcblk0  #then press the following keys in order to delete and recreate partition2
 p  #note start of partition2 - StartLBA - usually 139264
 d
 2
 n
 p
 2
 139264  #enter start of partition2 from above
 <RET>  #type return to accept suggestion
 w  #write

filetool.sh -b
sudo reboot

ssh tc@192.168.1.13  #pass: piCore

sudo resize2fs /dev/mmcblk0p2  #resize partition2
install dependencies
Assuming piCore is now installed and partition2 resized like above...
#download and install build dependencies
cd /tmp
tce-load -wil cmake compiletc squashfs-tools libudev-dev libsndfile-dev readline-dev libsamplerate-dev avahi-dev jack-dev git
wget http://tinycorelinux.net/9.x/armv6/tcz/fftw-dev.tcz  #from old repository
tce-load -il fftw-dev
sudo /usr/sbin/cache-clear
building SuperCollider
Assuming all dependencies above are installed...
#download and compile SuperCollider
cd /tmp
git clone --branch main --single-branch --recurse-submodules https://github.com/supercollider/supercollider.git
cd supercollider
mkdir build && cd build
cmake -DCMAKE_BUILD_TYPE="Release" -DBUILD_TESTING=OFF -DSUPERNOVA=OFF -DNATIVE=ON -DSC_IDE=OFF -DNO_X11=ON -DSC_QT=OFF -DSC_ED=OFF -DSC_EL=OFF -DSC_VIM=ON -DINSTALL_HELP=OFF -DSC_ABLETON_LINK=OFF -DCMAKE_C_FLAGS="-lncursesw" -DCMAKE_CXX_FLAGS="-lncursesw" -DCURSES_LIBRARY="/usr/local/lib/libncursesw.so" -DCURSES_INCLUDE_PATH="/usr/local/lib/" ..
make
sudo make install
cat install_manifest.txt | grep -v "/usr/local/include/\|/usr/local/share/pixmaps/\|/usr/local/share/mime/" > /tmp/sc.list
make clean

#create the SuperCollider tcz extension package
cd /tmp
tar -T /tmp/sc.list -czvf /tmp/sc.tar.gz
mkdir /tmp/pkg && cd /tmp/pkg
tar -xf /tmp/sc.tar.gz
cd ..
mksquashfs pkg/ supercollider.tcz
sudo mv supercollider.tcz ~
rm -rf /tmp/pkg
tce-load -i ~/supercollider.tcz
sclang -h  #just to check that it is working
On the laptop, open another terminal window and download the resulting compressed SuperCollider package:
Now that the two tcz packages are created and saved to the laptop, we can erase the SD card and start afresh. (It is possible to continue working with the same piCore install, but unused build dependencies would waste some space).
Install instructions
(for future installs you can skip all of the above and start here assuming you have kept the .tcz packages)
trash the old system and burn piCore-12.0.zip to the SD card again
put the SD card in the RPi and connect ethernet and 5V power
On the laptop, open a terminal and run the following commands:
ping 192.168.1.255  #first broadcast ping (stop with ctrl+c)
arp -a  #figure out which IP address the RPi has (here 192.168.1.13)
ssh-keygen -R 192.168.1.13  #resets the ssh keys to be able to log in again
ssh tc@192.168.1.13  #default password: piCore

sudo fdisk -u /dev/mmcblk0  #then press the following keys in order to delete and recreate partition2
 p  #note start of partition2 - StartLBA - usually 139264
 d
 2
 n
 p
 2
 139264  #enter start of partition2 from above
 <RET>  #type return to accept suggestion
 w  #write

filetool.sh -b
sudo reboot

ssh tc@192.168.1.13  #pass: piCore

sudo resize2fs /dev/mmcblk0p2  #resize partition2

#install dependencies
tce-load -wi alsa alsa-utils jack libsamplerate libavahi libudev readline git nano
On the laptop, open another terminal window and upload the compressed packages:
cd ~/Downloads
scp supercollider.tcz sc3-plugins.tcz tc@192.168.1.13:
Back on the Raspberry Pi...
cd ~
mv supercollider.tcz sc3-plugins.tcz /mnt/mmcblk0p2/tce/optional/
echo -e "supercollider.tcz\nsc3-plugins.tcz" >> /mnt/mmcblk0p2/tce/onboot.lst
echo -e "\nsudo /usr/local/sbin/alsactl -f /home/tc/mysound.state restore" >> /opt/bootlocal.sh

#autostart - optional
nano autostart.sh  #add the following lines
  #!/bin/sh
  jackd -P75 -p16 -dalsa -dhw:0 -r44100 -p1024 -n3 &
  sclang /home/tc/mycode.scd
chmod +x autostart.sh
echo -e "/home/tc/autostart.sh &" >> /opt/bootlocal.sh

nano mycode.scd  #add the following lines
  s.waitForBoot{
    {SinOsc.ar([400, 404], 0, 0.5)}.play;
  };

nano /opt/bootlocal.sh  #change from ondemand to performance in line 10
  echo performance > /sys/devices/system/cpu/cpu0/cpufreq/scaling_governor

#IMPORTANT - make the changes permanent
filetool.sh -b

sudo reboot
The piCore system should now have SuperCollider installed and (optionally) start at boot.
volume
To adjust the volume log in and run the following commands...
alsamixer  #set volume with arrow keys, ESC to exit
alsactl -f /home/tc/mysound.state store  #save in custom alsa settings file
filetool.sh -b  #make permanent
notes
running the make command with flag -j3 will usually just result in a out-of-memory freeze.
jackd and SuperCollider will be running as root when autostarting.
the start-up time from applying power to SuperCollider is making sound is ~20 seconds.
after the first backup (filetool.sh -b) the ssh-keygen -R <IP> will not be needed any longer.
In SuperCollider there are no readily available UGens for creating a fixed number of single sample impulses. One could cobble something together using Demand rate UGens...
(
c = {|dur = 1, num = 8|
  Duty.ar(Dseq([SampleDur.ir, dur / num - SampleDur.ir], inf), 0, Dseq([1, 0], num));
}.play(fadeTime: 0);
)
or another variant could be to use a combination of Sweep and Changed...
(
c= {|dur = 1, num = 8|
  Changed.ar(Sweep.ar(0, num / dur).ceil.min(num));
}.play(fadeTime:0);
)
but there is a more flexible technique using an envelope. The big win doing it like this is that we can play with the envelope's curvature and get different shapes.
//impulse train with curvature
(
c = {|
  t_go, // trigger
  dur = 1, // total duration in seconds (also frequency)
  cur = 0, // curvature or 'shape'. 0 = pulses at regular intervals
  num = 8, // number of impulses per duration
  amp = 1|
  var env = EnvGen.ar(Env(#[0, 0, 1], [0, dur], cur), t_go);
  var train = Changed.ar(ceil(env * num)) * amp;
  // train = train * (1 - env); // optional decreasing amplitude
  // train = train * env; // optional - increasing amplitude
  train;
}.play;
)
c.set(\t_go, 1);
c.set(\t_go, 1, \cur, 3, \num, 18); // start slow and go faster
c.set(\t_go, 1, \cur, -2, \num, 18); // slower and slower
c.set(\amp, 0.2);
c.set(\t_go, 1, \cur, 0, \dur, 0.5, \num, 200); // 200 for half a second = 400 Hz
The trick to converting an envelope into discrete impulses is to make the linear 0-1 ramp into whole number steps (scale up with * num and run it through ceil) and then trigger an impulse each time the step changes (using the Changed UGen). Then multiplying the train of impulses with the original envelope is optional. The extra multiplication will fade in or fade out the amplitude over the given duration.
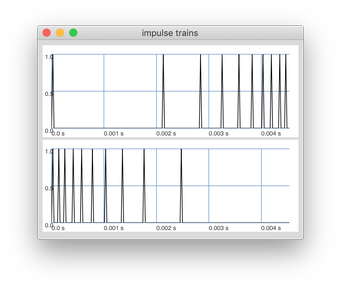
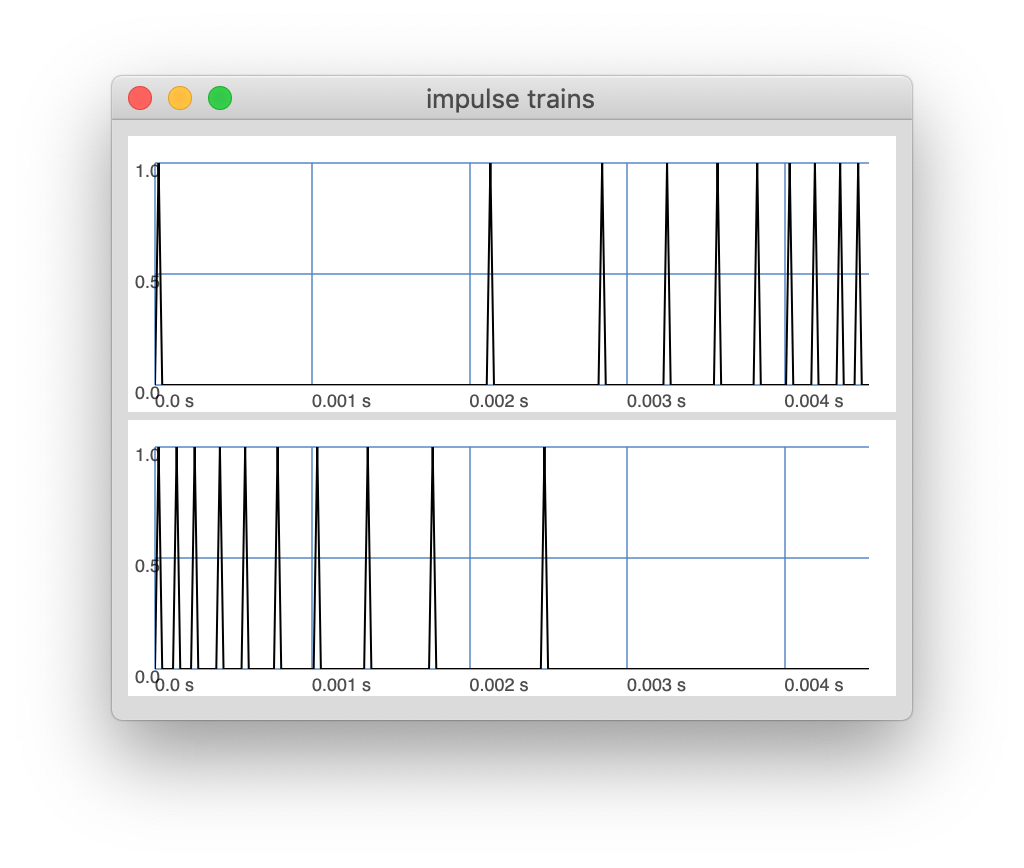
The plot below shows two short bursts. There are 10 impulses spread over 200 samples at a sample rate of 44.1KHz. The top one has its curvature set to 4 and thereby the impulse train gets exponentially faster. In the bottom plot, the curvature is the inverse -4 and thereby the train starts fast and then slows down.
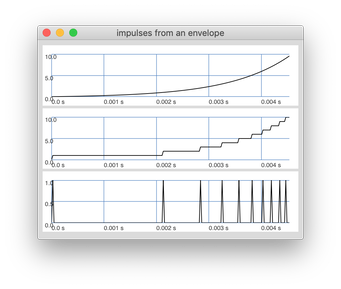
And here is the same (top) impulse train again but showing the process from the curved envelope, via the discrete steps and to the resulting impulses.
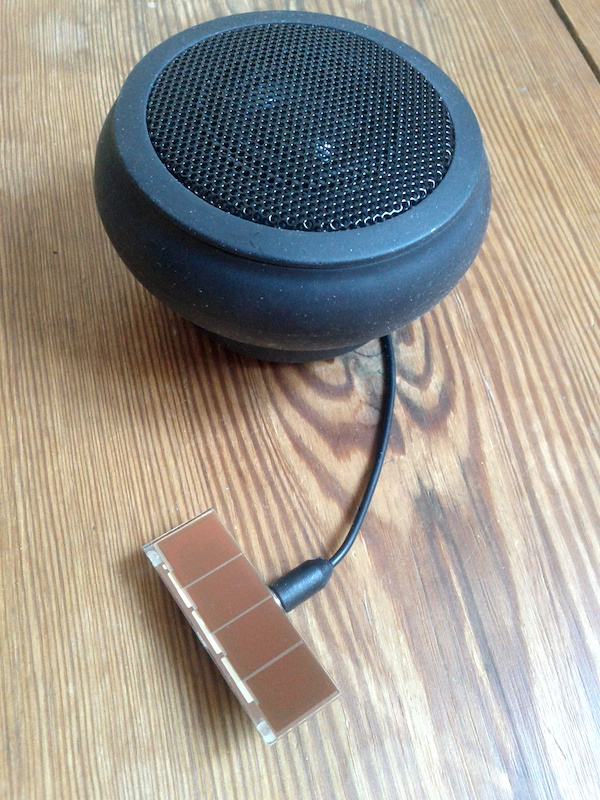
Here is a very simple and useful tool that can be built out of a small solar cell and an active speaker (headphones also work). This tool translates light into audio and will allow you to hear how much certain LED or fluorescent lamps flicker. It can be used to test and figure out the quality of LED lamps, learn about PWM dimming and also be a fun way of generating sounds.
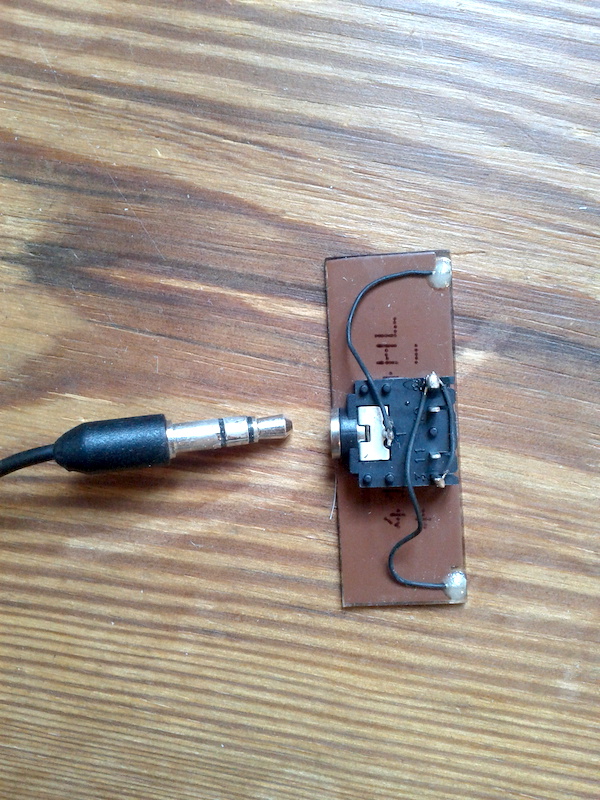
My solar cell came from a broken calculator and the loudspeaker (roxcore) I had since before. The speaker is active i.e. it includes an amplifier and a battery. I simply glued a 3.5mm audio connector to the back of the solar cell and soldered some wires so that the + and - from the cell directly connect to the TIP and GND of the 3.5mm audio jack. One could also add a capacitor in series to remove the DC offset, but I trust that the speaker has one built-in.
Note: check that your solar panel is not generating too high voltage. Mine outputs ~3V maximum and that is okay. Bigger panels usually output 6V or 12V and that might damage your speaker.
The resulting sound is most often a 50Hz hum, but it can also be much more complex and interesting with harmonics, noises, chirps and clicks. The worse LED or fluorescent light fixture the better the sound. Old tungsten and halogen lamps produce a constant voltage (DC) so the result is only silence.
Making use of some old original Raspberry Pi Model A...
Despite having very little RAM (256MB) the Raspberry Pi Model A from 2012 can play video and sound in high resolution via HDMI. So here is how I set up four of them as independent remote-controlled video players. I used the program OMXplayer and the pyliblo and omxplayer-wrapper Python libraries. This setup will also work great with Raspberry Pi Zero and any other low-end model.
To control the players I use SuperCollider and send Open Sound Control messages, but other OSC capable programs or mobile apps will also work. There is a similar system that is controller via physical buttons (GPIO) described in the /f0blog/cheap-4-channel-videoplayer post.
Instructions for installing
This will require at a minimum a 4 GB SD card and a way to connect the Raspberry Pi to the internet.
Prepare the RPi
Burn the Raspberry Pi OS Lite image (2020-08-20-raspios-buster-armhf-lite) to the SD card
Enable SSH by creating an empty file in the root directory of the SD card called ssh.
touch /Volumes/boot/ssh
Put the SD card in the Raspberry Pi and log in via SSH.
On your laptop find a video file and name it video.mp4.
Download the Python script from here below (f0videoplayerOsc.py).
Put the video and the python file in a directory (here Downloads) and in Terminal type...
cd ~/Downloads
scp video.mp4 pi@192.168.1.102:  #edit IP of your Raspberry Pi
scp f0videoplayerOsc.py pi@192.168.1.102:
Autostart
Log in to your Raspberry Pi again and type...
crontab -e
Add the following to the end of the crontab file...
@reboot cd /home/pi && python3 f0videoplayerOsc.py video.mp4
Type ctrl+o and ctrl+x to save and exit.
Restart...
sudo reboot
Now the player should launch at boot and start looping a file in the home directory called video.mp4. Send OSC messages to port 9999 to control it (see below).
It is fairly easy to adapt and add new commands to the Python player script. See the omxplayer-wrapper documentation. One can also query and send back information - for example about current position in video.
Test
Here is some SuperCollider code for testing...
n= NetAddr("192.168.1.102", 9999);  //edit IP of your Raspberry Pi
n.sendMsg(\pause);
n.sendMsg(\play);
n.sendMsg(\set_position, 1000);
n.sendMsg(\set_position, 100);
n.sendMsg(\set_position, 10);
n.sendMsg(\hide);
n.sendMsg(\show);
n.sendMsg(\set_dimensions, 100, 100, 200, 200);
n.sendMsg(\set_dimensions, 0, 0, 1920, 1080);  //display dim
n.sendMsg(\set_crop, 100, 100, 200, 200);
n.sendMsg(\set_crop, 0, 0, 640, 360);  //movie dim
n.sendMsg(\set_volume, 0.0);  //0.0-10.0
n.sendMsg(\set_volume, 5.0);
n.sendMsg(\set_volume, 1.0);  //default
n.sendMsg(\set_rate, 1.0);
n.sendMsg(\set_rate, 0.75);
n.sendMsg(\set_rate, 0.5);
n.sendMsg(\set_rate, 0.01);
n.sendMsg(\set_rate, 1.0);  //default

//slow down
(
Routine.run({
  100.do{|i|
    n.sendMsg(\set_rate, i.linlin(0, 99, 1.0, 0.01));
    0.025.wait;
  };
});
)
n.sendMsg(\set_rate, 1.0);

//zoom out
(
Routine.run({
  var num= 100;
  var w= 1920, h= 1080;  //display dim
  num.do{|i|
    n.sendMsg(
      \set_dimensions,
      i.linlin(0, num-1, 0, w/2).asInteger,
      i.linlin(0, num-1, 0, h/2).asInteger,
      i.linlin(0, num-1, w, w/2+1).asInteger,
      i.linlin(0, num-1, h, h/2+1).asInteger
    );
    0.025.wait;
  };
});
)
n.sendMsg(\set_dimensions, 0, 0, 1920, 1080);

//zoom in
(
Routine.run({
  var num= 100;
  var w= 640, h= 360;  //movie dim
  num.do{|i|
    n.sendMsg(
      \set_crop,
      i.linlin(0, num-1, 0, w/2).asInteger,
      i.linlin(0, num-1, 0, h/2).asInteger,
      i.linlin(0, num-1, w, w/2+1).asInteger,
      i.linlin(0, num-1, h, h/2+1).asInteger
    );
    0.025.wait;
  };
});
)
n.sendMsg(\set_crop, 0, 0, 640, 360);

//stop and shut down the Raspberry Pi
n.sendMsg(\shutdown)
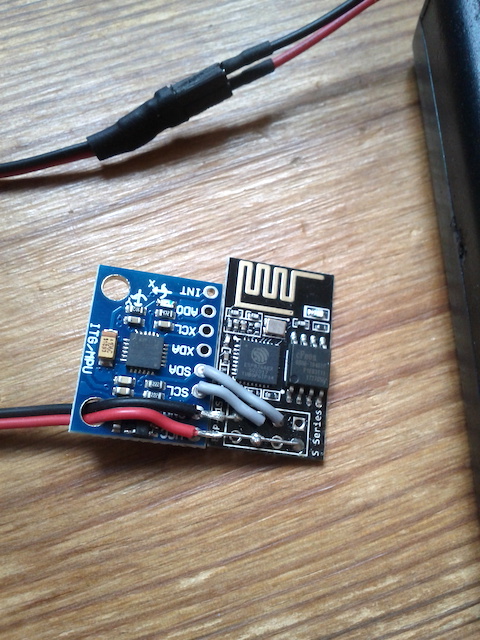
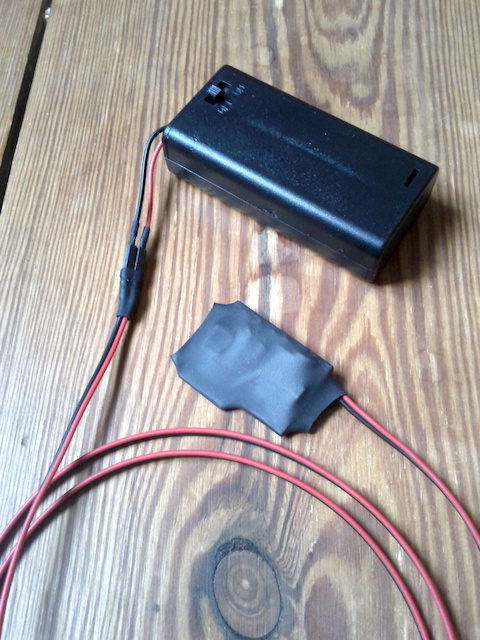
Recently I built a bunch of really cheap and simple wireless sensor circuits that send Open Sound Control messages. It is just two modules next to each other powered from two AA batteries.
The sensor module is the MPU-6050 with 3D accelerometer and gyroscope. The microcontroller is an ESP8266-01. Material cost per unit is around €4,50 (excluding batteries).
There are a few settings like smoothing, update rate and thresholds which can be controlled by sending OSC messages to the ESP module.
Attached below are examples for SuperCollider and MaxMSPJitter, schematics and the firmware (PlatformIO).
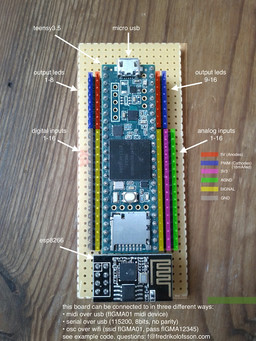
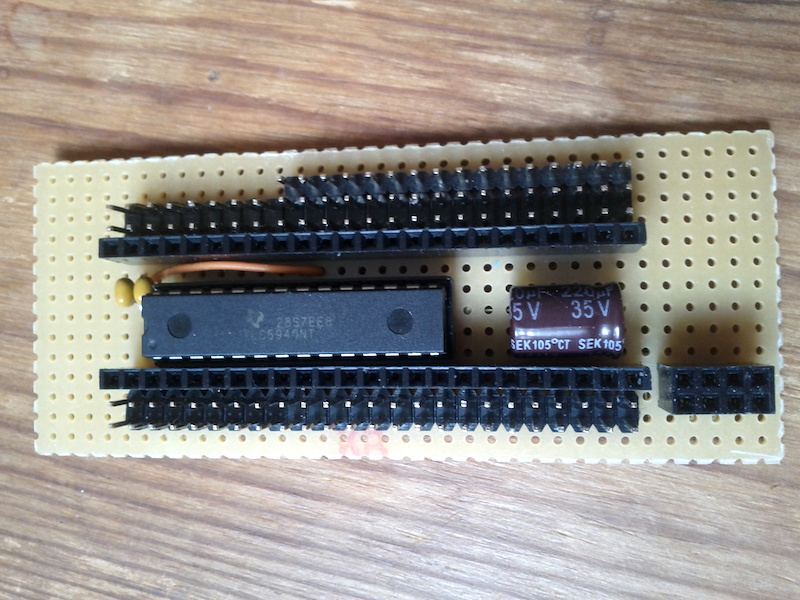
Here is a board I built in autumn of 2018. It is for making custom hardware controllers with sliders, buttons and LEDs. This version (v3) communicates via MIDI, Serial or over WiFi using OSC.
The board is just a Teensy 3.5 with a TLC5940 LED driver and an optional ESP8266-01 module. There are 16 analogue inputs, 16 digital inputs and 16 PWM outputs. It is powered from USB.
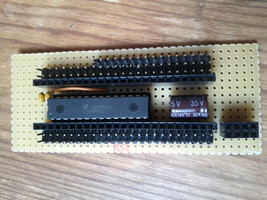
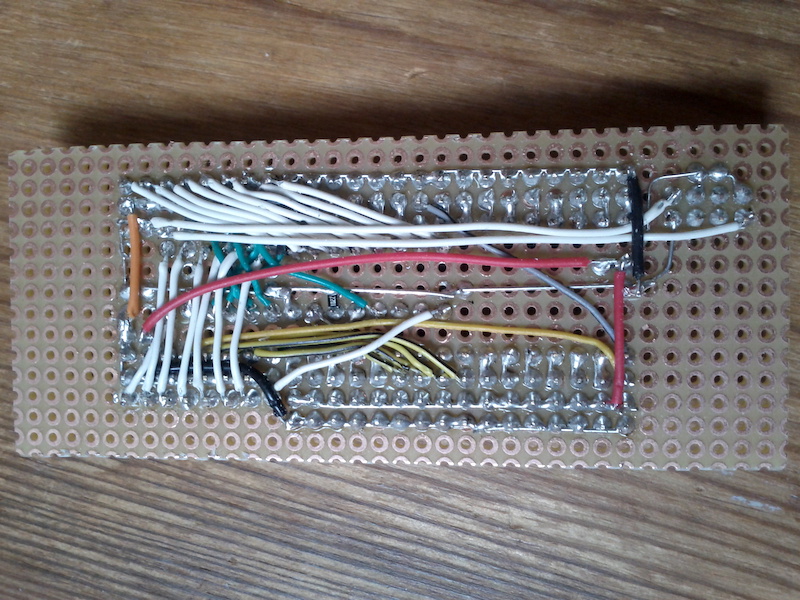
Under the hood it looks like this...
Power to the ESP8266-01 is supplied from the Teensy 3V3 pin. Note that this is pushing the limits. The Teensy 3V3 rail is only rated for 250mA and an ESP module can draw quite a bit more than that (current spikes). As a precaution I added big capacitors close to the ESP and it has been working well so far.
When using MIDI the analogue input and PWM output resolutions are 7bits, and over Serial and OSC my firmware is using 8bit resolution. The hardware supports 10 and 12-bit resolutions but I decided that 8 is enough. It will keep the communictation protocol simple and reduce the amount of data being sent.
Attached are several examples for SuperCollider and MaxMSPJitter. They demonstrate how to talk to this box, how to control LEDs and read sensor data via MIDI, WiFi and Serial.
Also attached are the schematics and Teensy and ESP firmware files. In the file tamas3_teensy.ino one can customise debounce time, MIDI note and control numbers, update rate etc. And in the file tamas3_esp.ino there are settings for how the WiFi should behave (soft-access point with DHCP is the default).